Showing posts with label products. Show all posts

Tuesday, 27 March 2012

PROJECT LIFE WEEK 12

Am caught up now going strong with Week 12, and yes, Week 9 will be out on this blog soon. *keep on reading downwards as I have something exciting going on there*

This week was a very colourful week as my photos were really colourful too, being in the city of Bangkok for most of the week, so I went a little colourful with my paper selection and I really like this week. In addition,I have an insert (something that I truly thought that I might never need), due to the number of photos that I took that I really want to document.

Here is the left side with the insert. I did photographed it this way as I thought it would be easier to read and see.


All sorts of fun stuff that I used here, including some of the products in my etsy store and my "hot-at-the-moment" doily punch. Funny how we take many many many more photos when we are overseas. But I think along the process I've learnt to cut down on the multiple photos that I take as I have no patience to look through all of them.


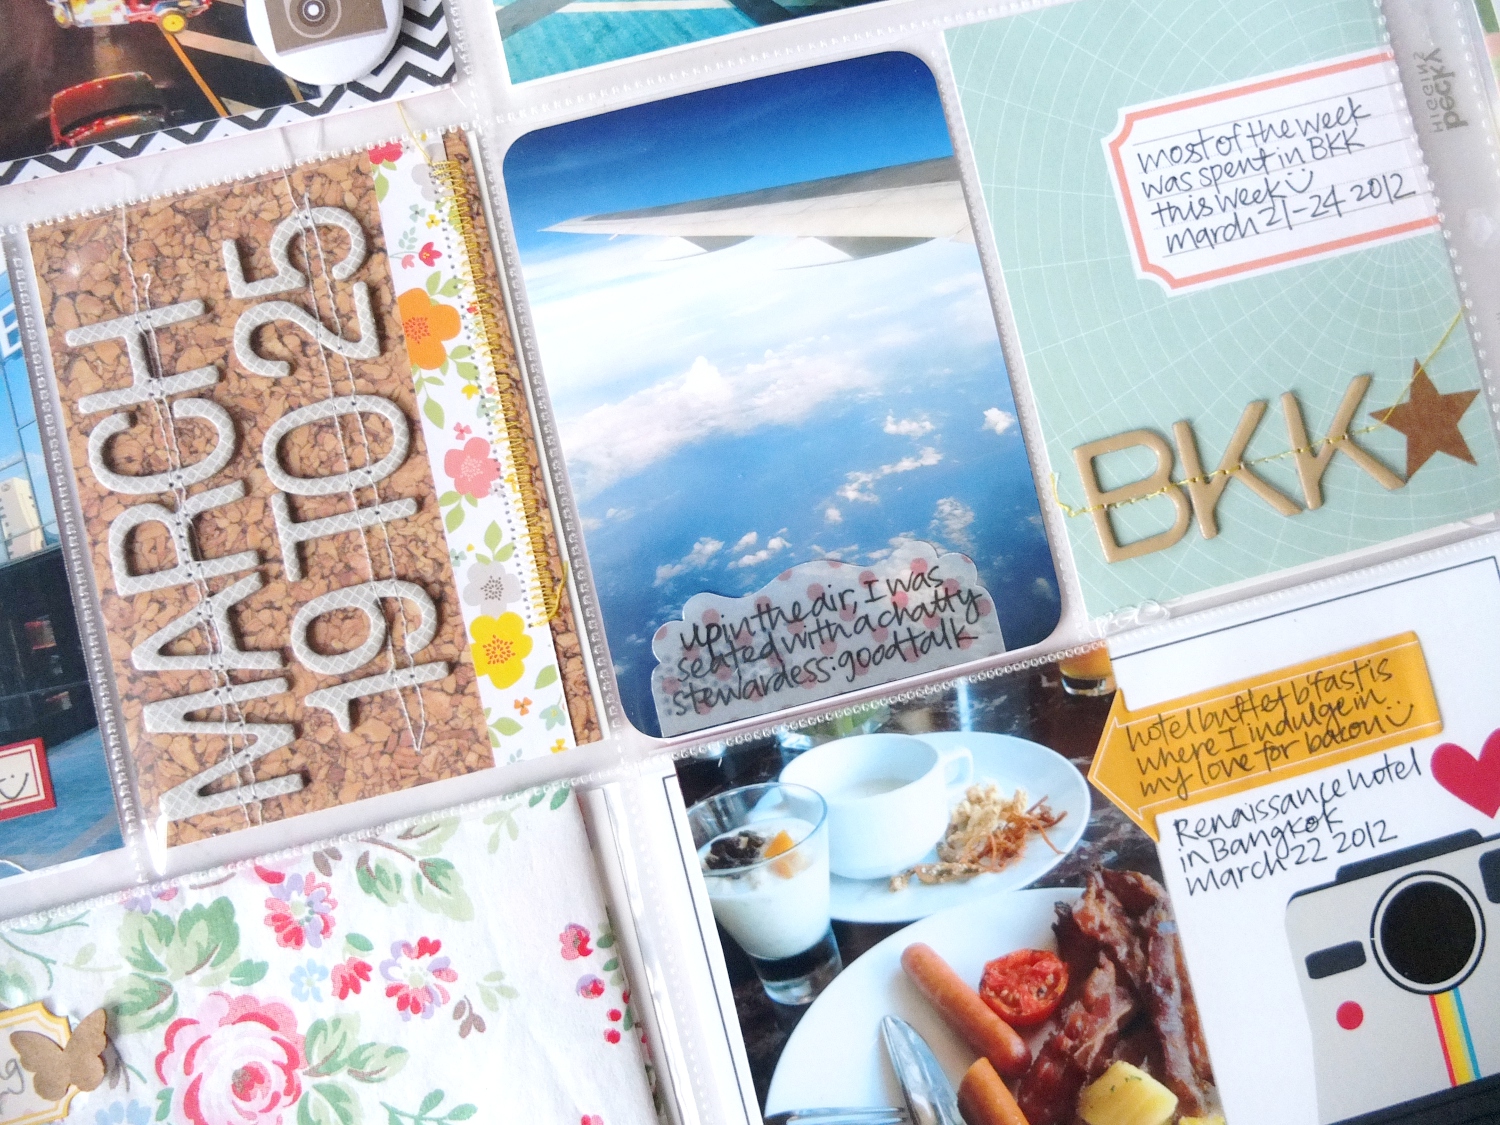
The American Craft thickers are finicky and so I sticked them down and ran the sewing machine through them for good measure, of course I like that look too. For some variety, I used yellow thread for the first time over the BKK words. Am still madly in love with the polka dot vellum and just want to continue to find new ways to use it.

And on to the right side,

Used a bunch of my favourite things, including the Dear Lizzy Camera stamp, Stepping Stone Alpha, Vintage Doily martha steward punch, Papertrey Ink Doily, my own printable journaling cards, manila shipping tag and labels, any many labels.

Spot the instgram stamp mark there. Yes I tried my own hand at designing my own after seeing Kelly Purkey show hers off. So this is my own interpretation for an instagram stamp. Given how much we use instagram in this day and age, I forsee myself using it more and not just on my Project Life pages.

I have some favourite pockets that I really liked from this week and want to just share some of them and some of the things that I did with them.
I am totally on board the chevron craze as you can tell and a doily one too (: And I loved using one of the camera flair button that I designed that can be found here, as a part of a set of six.
And the photo is a common sight that is seen in Bangkok all the time.

Added a bit of personalisation with a stamp on the top border of the 3x4 card, as well as punch outs from the Vintage Doily punches. The patterned papers came with the label printed on it, perfect for little bits of journaling.

More use of the yellow thread, love the effect even though I'm lazy to change out the thread from time to time.

Wanted to save this napkin that I bought at Chatuchak because of the pretty patterns on it. In order not to "damage" the napkin I put the descriptive label on the plastic pocket.

Used my Polaroid journaling cards, found here, in this pocket. Like how it gives a pop of colour to the pocket (:

Here's how the pages look in my album now.


Now for another little announcement, as I alluded to in my previous post(s) and as some of you have guessed, I plan on making some stamps in gorgeous red rubber with wooden handles, mainly for my own use but I'll be offering them in my store. They won't look like the ones I pictured previously but would look like this instead:


And to celebrate their entering the store, I will be offering them at a special pre-order price, until Good Friday on 6 April (Friday). Shipping is US$4 internationally for the first stamp (unless you stay in Singapore) and US$1 for each subsequent stamp. (Note that if you order than more than one stamp, I will refund the balance extra shipping that is charged.)

Here are what the designs will look like with the dimensions that they will be printed in. (ignore the watermark ''piecedpapers', the final designs will not have them).

Click here to view cart when finished
 

Dimensions: 0.5" by 1.5"
Price: US$15 US$12


Dimensions: 0.5" by 1.5"
Price: US$15 US$12


Dimensions: 0.5" by 1.5"
Price: US$15 US$12
Dimensions: 0.5" by 1.5"
Price: US$15 US$12


Dimensions: 1" by 1"
Price: US$15 US$12

Used here:


Those are the designs that I have for this first go around and I can't wait to use the ones that I haven't made a testing mold of yet, especially on my Project Life.

Project Life is a line of products by Becky Higgins, and can be used for documentation of daily life or anything else you may want. I am using it to remember the year and take more photos of  my everyday. For those who live in Asia, you can get your PL supplies from ScrapliciousFollow my PL journey hereYou can check out more project life week pages all around the web, check out The Mom Creative

Wednesday, 14 March 2012

GIVEAWAY GOING ON

I'm excited today as Stephanie Howell is featuring my little shop over at her blog, as she had loved the journaling cards that I have for sale in my little shop.

And she's giving away some of my printable journaling cards, the polaroid and hearts-a-flutter set


Do head over to Steph's blog if you would like a chance to win a set of the above printable journaling cards. Do remember also that you can follow me on Twitter to be updated with my latest shop additions and occasional chances to get some of my printables.

Friday, 17 February 2012

OF VINYL AND WASHI TAPE

No Project Life spread yet for me :(  Have been too busy this week and hoping to catch up with it for the weekend.

Just wanted to share a mini project that I did with my silhouette SD.


I designed the placement of the words and then cut them out on Vinyl. This is good stuff, as it is thin, which doesn't add bulk to the notebook. The other good thing is that if this were cut out on paper or cardstock, it would be difficult to ensure that the placement of the words remain the same, as transfer paper is used.

To understand more about what I'm talking about you can click here where there is a much better explanation (:

Here's a close up look to what it looks like


There's a "frosted" plastic cover on top which explains why it looks a bit blur. (:

These were made for friends, but I will be putting some up in my etsy store if anyone is interested.
So as everyone knows, CHA Winter 2012 was the CHA of Washi tape or paper tape. Having a sizeable collection, storage is an issue. And the phrase out of sight out of mind is very applicable. So I sought a solution.

While in my search, etsy had some gorgeous ones, but it was out of my price range, especially factoring in shipping from the US. Enter a great place to find things that you never thought that you would need here in Singapore - Daiso. And the absolute best part is that it is just $2.


This is originally a dish/plate holder - imagine dishes slotted in between every two 'poles'. Once I saw it, thinking that it was indeed similar to what I had spotted on etsy, albeit shorter, I knew that it would work.


On average each 'pole' can take four tapes, depending on the thickness. As the rolls from Amercian Crafts and Hambly seem to be smaller in diameter, this made it fit perfectly with my bigger size MT ones. And you can classify them to dots, stripes, themed or mix them all up (:

 So now it will sit on my desk as a gentle reminder to be used, and yet not rolling about the place in a container. And it is easy to move around if needed too. And you can personalise it by painting the wood or decorating it with Washi tape (:

For anyone who is curious on how you can use these pretty tapes, you can check out this post on the Scraplicious blog. It is especially convenient for those of us who are doing Project Life.

For those in Singapore and Asia, Scraplicious is still having a promotion to giveaway a $10 gift voucher on FaceBook and Twitter so do check it out. And remember to go down to your nearest Daiso to find yours.

Saturday, 21 January 2012

ANNOUNCEMENTS

Hi everyone, just wanted to say that I've moved some of my buttons to etsy. I will also be listing other items in due time. To get there click on the icon below that can also be found in my sidebar.


I will slowly be moving my badges there, but the printables will remain on the shop page.

 I have also listed new sets on etsy. Here's a peek!


Thanks for looking and thank you for your patronage thus far.

Thursday, 19 January 2012

SHOP UPDATE: NEW JOURNALING CARDS

Hi just popping in to say to everyone who is working hard on Project Life, strive on and keep it simple to make it work for you.

On the subject of Project Life, I have just some new memo cards in the shop for journaling purposes to share.


Aren't the colours pretty? The colour palette for this collection comes from the fashion colour trends of Spring 2012. Perfect to express the happiness of this season.

The cards come as a set of six journaling cards, 3.88inches x 2.88inches as well as two label cards, that are slightly smaller. The folder that will be sent to you once you purchase the set will contain the JPG and PNG files for each individual journaling card and a PDF as pictured below so you can just print immediately. Convenient for those of use who do not want to spend to much time fiddling with photoshop.

MEMO CARDS SET 1

MEMO CARDS SET 2

MEMO CARDS SET 3

For those who are interested in all the sets, it comes as a special bundle of just $5 for all the three sets of files. A great bargain. I for one, will be using them in next week's PL layout for sure.

Thanks for looking and have a great week!

Wednesday, 18 January 2012

IN HEELS

Happy Hump Day of the week everyone!

Have a quick layout to share and let you know more about the details of the project, and lastly my process

Firstly the layout
Supplies: Studio Calico Snow Cone add-on, Martha Stewart, Jenni Bowlin, Crate paper, American Crafts

I used a starburst stamp (Studio Calico Kit exclusive) and stamped with Versamark. I then used the pink glitter embossing powder from American Crafts. If you need sparkle, I'll recommend using the glitter embossing powders as they do not flake off at all once they are heat set.

Stitched through the Thickers. Helps them stay in place as well as adds dimension to it.

 
Just got the Jenni Bowlin Grandma Doily's punch. Perfect for making cute punch outs. Also stitched underneath my journaling, love the texture. 

Ran my page through the layout machine to add lines to the butterflies.

MY PROCESS | I had decided to make a page with the butterflies swirling about the place. First I decided to establish my background. Instead of a piece of patterned paper, I decided to use my starburst stamp. I then sketched out the path I wanted the butterflies to go.

After punching through a lot of butterflies, I placed them along the path. Of course, being flexible, or what some would call fickle, I did move it quite a bit from the inital path. I stuck the butterflies down with a teensy bit of tape, as I knew that I wanted to run stitching through it and did not want to gunk up my needle.

Next I added strips of paper to anchor the page further, before adding two hearts, one of them is two hearts layered on top of one another. I ran stitching through them too.

I then added the border scalloped strips and stickers, as well as a doily and I was done.

Thanks for looking!

Just also wanted to add that I have some new badges available in the shop


I can't wait to use these on my pages and Project Life next week, especially the adore set.

Monday, 16 January 2012

THE DAILY GRIND

Winner of the giveaway will be posted tomorrow.

Well, Project Life Week 2 is under way on my table, but non-available light and lack of time is hindering its progress, but spur on I will.

In the meantime I have a layout to share:

Supplies: Silhouette, Studio Calico, American Crafts, Ocotber Afternoon, Crate Paper

Scrapbooking is in the end about documenting the ordinary life that passes me by. The reason for scrapping this was as I never imagined myself working at the heart of the business district in Singapore (its the equivalent of Wall Street in New York), with the sun setting by the time I leave the office.

The typewriter detail is one that I had been hoarding for the perfect layout, due to my work as a journalist. The newsprint scraps from Studio Calico was also fantastic to add to the details for my work.

My silhouette was also put to good use with the background polka dots cut out with a kraft on kraft feel as well as to cut out the title.

Just to let everyone know too, there has been an update in the shop, with some more items.


I have used them in my PL week 2 layout which I'll post later in the week. Do check it out if you like them and they help in the documentation of daily life, not just PL. Thanks for your support! I'm having a blast with this creative process.

I'll be back with a printable freebie when I post about Project Life again.
Related Posts Plugin for WordPress, Blogger...