Showing posts with label scrappinstudio. Show all posts

Monday, 12 November 2012

Some DT work


PhotobucketHi everyone,

Just some layouts to share using the October Studio Calico Roller Rink Kit that I got from scrappinstudio.

Using contents from the kit, I decided that I wanted the wooden chevron to be part of the focus, and used strips of patterned paper to "decorate" the chevrons. I decided to juxtapose this chevron with the wooden veneer chevrons in the "Crack the Whip" add-on. Love using the woodgrain thickers too (:


I put my Silhouette Cameo to use with this layout, cutting 27, the age I'm turning, and highlighted one, by putting a different color behind one of the digits. I also decided to use the phrases in the sticker sheet that I thought would define what I want to continue growing in grace to be. I'm also a tad obsessed with the wooden veneer chevrons.


Hope you liked what I have to share. I'm still working on more projects that I hope to get more of a chance to share with you. Till then, toodles.

Wednesday, 8 February 2012

PROJECT LIFE WEEK 5

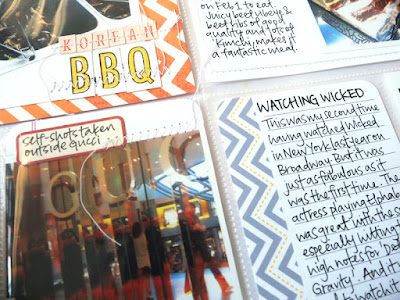
Week 5 is now lock and loaded and ready to go (:

It was an eventful week being the second week of Chinese New Year, though I didn't take that many photos

For this week's spread, I decided to go with a "whiter" design, especially with the new set of chevron cards that I designed. I'm pleased with the more graphic look, but I also like the fact that from one week to the next, it can look so different (:


It's an orangey, yellow, grey themed. I also put the Jenni Bowlin doily punch to work. (It's the grey punch outs)


Particularly love the doilies stitched at the bottom of the date tag. I also ran the "Amy Tan" letters I put for the dates for some stitching.


Also received my Studio Calico Kit from ScrappinStudio, and used the alpha stamps that were in the Stepping Stone Add-on. The "click" button was made by me, custom designed.


Lots of stitching too. Not just physically, but even with the cards as you can see the yellow faux stitching on the journaling cards.

And there you have it, Week 5 of my Project Life Album for 2012.

The journaling cards with chevrons that I designed are still available free for my blog followers. Go to the previous post or click here for more information.

For those in Asia and doing Project Life, do take some time to check out this flickr group for PLers in Asia to share their pages and encourage one another. http://www.flickr.com/groups/scraplicious

Also check out the Scraplicious blog for even more Project Life inspiration on Scraplicious Project Life Wednesdays. There's a tutorial on how to use Picasa to make a collage with your photos.

Thanks for looking and hope you have been inspired somewhat (:

Project Life is a line of products by Becky Higgins, and can be used for documentation of daily life or anything else you may want. I am using it to remember the year and take more photos of  my everyday. For those who live in Asia, you can get your PL supplies from ScrapliciousFollow my PL journey hereYou can check out more project life week pages all around the web, check out The Mom Creative


Thursday, 26 January 2012

DELIGHT IN THE LITTLE THINGS

A layout that I created recently using the Studio Calico Kit County Fair and Ring Toss Add-on

Supplies in Studio Calico Kit from: Crate Paper, Basic Grey, Jenni Bowlin, Pebbles. American Crafts

I started by stamping the circle stamp on the cardstock slightly off-centre. As the circle is already sectioned off, it helped to know how to best draw the starburst. I used a ruler to draw on the patterned paper, to indicate where to cut to make the pattern, purposefully leaving some blanks to add visual interest.

After layering the papers, I stitched them down with the sewing machine to add some texture to the layout. And then scattered some embellishments around. This is when using a kit comes in really helpful as there are coordinated papers which are not too matchy matchy yet look like they come from the same set.

Most stitching generally to add texture to the layout.

Hope that this layout has "scattered some sunshine" to you as you view it today.

Wednesday, 18 January 2012

IN HEELS

Happy Hump Day of the week everyone!

Have a quick layout to share and let you know more about the details of the project, and lastly my process

Firstly the layout
Supplies: Studio Calico Snow Cone add-on, Martha Stewart, Jenni Bowlin, Crate paper, American Crafts

I used a starburst stamp (Studio Calico Kit exclusive) and stamped with Versamark. I then used the pink glitter embossing powder from American Crafts. If you need sparkle, I'll recommend using the glitter embossing powders as they do not flake off at all once they are heat set.

Stitched through the Thickers. Helps them stay in place as well as adds dimension to it.

 
Just got the Jenni Bowlin Grandma Doily's punch. Perfect for making cute punch outs. Also stitched underneath my journaling, love the texture. 

Ran my page through the layout machine to add lines to the butterflies.

MY PROCESS | I had decided to make a page with the butterflies swirling about the place. First I decided to establish my background. Instead of a piece of patterned paper, I decided to use my starburst stamp. I then sketched out the path I wanted the butterflies to go.

After punching through a lot of butterflies, I placed them along the path. Of course, being flexible, or what some would call fickle, I did move it quite a bit from the inital path. I stuck the butterflies down with a teensy bit of tape, as I knew that I wanted to run stitching through it and did not want to gunk up my needle.

Next I added strips of paper to anchor the page further, before adding two hearts, one of them is two hearts layered on top of one another. I ran stitching through them too.

I then added the border scalloped strips and stickers, as well as a doily and I was done.

Thanks for looking!

Just also wanted to add that I have some new badges available in the shop


I can't wait to use these on my pages and Project Life next week, especially the adore set.

Thursday, 5 January 2012

STITCHED CHEVRONS

I finally had the sunlight needed to capture the stitched chevron layout that I have been working on as posted in my previous post.

Supplies: Studio Calico Brooklyn Flea: Pebbles, My Mind's Eye, October Afternoon, Crate Paper

As mentioned I was inspired by all the chevron that has been everywhere in design, and believe that this was inspired by an image  that I saw on Pinterest but never pinned down.

It seemed fitting to that I made the layout about clothes, the first online order that I made with Modcloth. It was during their recent sale on their sale items and shipping to Singapore was reasonable. I have been a long lover of the retro vibe that their cloths have and decided to take the plunge to order. And the results, I'm really pleased about it.

I left the strong some what messy strands of thread as I liked the homespun feel that it gave. I probably should have shown how I made the page, but my table is too messy to do something like that. That is probably something I should work on too : P


MY PROCESS | I got a piece of pattern paper I was planning to purge and drew using a ruler the starburst first and cut it up. Never being one that needs precision, I eyeballed the spacing, and pretty much most of the cutting and drawing I did. Hence some uneveness in the chevrons. You could probably draw it on the computer if you need precision, but for me that would be too much work.

I then did each starburst layer separately and by feel, the only thing I knew was that I wanted the strips to be pointing in different directions. After sticking it down with a tiny bit of adhesive, I went crazy with the sewing machine. First stitching the starburst, then individually stitching down each chevron. I probably did not need to stitch so much, but I really liked the effect.

My journalling is hidden as I didn't want it to take away from my background design. The cloth tag and sticker are from Modcloth and came with my order. I also loved the interior of the box, with swirls.

Thanks for reading and hope you liked this particular layout and reading how I did it.

Next up, taking pictures of my completed (yay!) December Daily album.

Tuesday, 3 January 2012

HELLO 2012

Happy 2012 everyone!

It's here the new year and it's a mixed bag of emotions to have to dig through.
I have also done my Project Life cover for 2012. I really can't wait to document how 2012 looks. And  my machine stitching made an appearance.


Supplies: Project Life Clementine Kit, Elle's Studio, Jenni Bowlin, American Crafts

Love that I managed to include elements that are me. Doilies, butterflies, black and white, patterns and stars, as well as my faith.

As mentioned previously, the lack of availability of the products in Asia was the main stumbling block towards this endeavor that I had wanted to take part in previously. But with a good community over at Studio Calico as well as having the products in my hands, I believe that I will be able to keep up with this "monster" of a project, in a good way of course.

As I was packing my room, I stumbled across old photos and diary entries and was amazed by the thoughts taht I had in my head then. And also the type of memorabilia that I saved. Over the last few years, this has decreased, though I am documenting through scrapbooking, which gives me my creative fix too. So this album will be where I keep all those little knick knacks. And any other additions will go into my Smashbook. So i'm excited that all the little bits of life will have somewhere to go.

And for everyone in this journey to document the everyday, here's to 2012 being a year of documentation of the everyday.

Project Life is a line of products by Becky Higgins, and can be used for documentation of daily life or anything else you may want. I am using it to remember the year and take more photos of  my everyday. Follow my PL journey hereFor those who live in Asia, you can get your PL supplies from Scraplicious.

Aside from Project Life, I have been having fun with the last purchase of the year that I made and am extremely pleased about- a sewing machine. I have always liked the homespun look and have tried replicating it with handstitching. While as great as handstitching is, the machine stitching has a different type of feel and of course is neater and quicker if you get it right.

So after having an appointment cancelled on me, I decided to get a machine. It was a weighed out decision and I had initially thought of getting a smaller one, but then decided to plunge in headfirst with the normal sized one, especially since I have an extremely large fabric stash. And since then I have been a sewing machine freak, for lack of a better way of phrasing it.

And here is my Brother LS 2125 and a layout I worked on, inspired by all the chevron that has been trendy everywhere as well as the starburst shaped design. Done with the Studio Calico December Brooklyn Flea Kit.


Definitely a layout that could have been done without the machine, but looks so much better with it (:


Related Posts Plugin for WordPress, Blogger...